

FINGERPICKING KEY
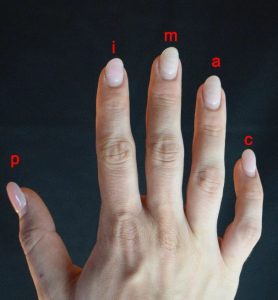
The right hand:
P = Thumb
I = Index
M = Middle
A = Ring
Fingerpicking Pattern No. 1
This is the most essential fingerpicking pattern to start with. It requires no left hand chord or fretted notes. It is used in many popular fingerpicking songs and some songs are slight variations of this same pattern.
We have all open strings being plucked in sequential order. Each note is a quarter note in duration and will last exactly one second each if played at 60bpm.
Lets get to playing!
We will pluck each open string in order starting from the 6th string (Low E) and ending on the 1st (High E).
Step 1. Lets start with thumb (p) and pluck the 6th-4th string
Step 2. Pluck index (i), middle (m) and ring (a) on the 3rd-1st strings.

Here is a video demonstration of the finger picking pattern:
If you were having trouble please contact us and we will help you!
FOLLOW US ON
Get our FREE Fingerstyle Workbook!
RELATED BLOG POSTS

Fingerstyle Guitar Exercises for Building Speed and Precision
Improving speed and precision in fingerstyle guitar requires focused practice. Here are a series of exercises designed to enhance your finger dexterity and overall technique.
Exercise 1: Chromatic Scales
Play chromatic scales using all four fingers. Start slowly and gradually increase the speed.
Exercise 2: Finger Independence Drills
Practice moving each finger independently while keeping the others still. This builds coordination and strength.
Exercise 3: Alternate Picking
Focus on alternate picking with your fingers. Use a metronome to maintain a steady tempo.
Exercise 4: Arpeggiated Chords
Practice arpeggiating chords, starting slowly and increasing the tempo. This helps improve precision.
Exercise 5: Fingerstyle Patterns
Create and practice various fingerstyle patterns, gradually increasing the complexity.
Conclusion
These exercises will help you build speed and precision in your fingerstyle playing. Consistent practice is key to seeing improvement.
The Science of Fingerstyle Guitar: Understanding Rhythm and Timing
Rhythm is the backbone of music, and understanding it is essential for mastering fingerstyle guitar. Here’s a deep dive into the importance of rhythm, along with exercises to develop your timing and groove.
The Importance of Rhythm
Rhythm creates the structure of a song and guides the listener’s experience. In fingerstyle guitar, maintaining a steady rhythm while playing complex melodies is crucial.
Exercises to Develop Rhythm
Exercise 1: Metronome Practice
Start with a metronome set to a slow tempo. Play simple fingerpicking patterns, focusing on staying in time.
Exercise 2: Clapping Rhythms
Before playing, practice clapping out the rhythms of your favorite songs. This helps internalize the groove.
Exercise 3: Syncopation
Experiment with syncopated rhythms by playing off the beat. This adds interest to your playing.
Conclusion
Understanding rhythm and timing is vital for fingerstyle guitar. By practicing these exercises, you’ll develop a solid sense of groove that enhances your overall playing.
How to Create Your Own Fingerstyle Guitar Arrangements: A Step-by-Step Process
Creating your own fingerstyle guitar arrangements can be a rewarding experience. Here’s a step-by-step guide to help you craft your unique pieces.
Step 1: Choose a Song
Start with a song that resonates with you. It could be a favorite tune or a melody you’ve composed.
Step 2: Analyze the Song
Break down the song into its components: melody, harmony, and rhythm. Understand the chord progression and how the melody fits within it.
Step 3: Melody and Harmony
Begin by identifying the melody notes. Once you have the melody, find chords that complement it. Experiment with different voicings.
Step 4: Create a Fingerpicking Pattern
Develop a fingerpicking pattern that supports the melody and harmony. Keep it simple at first, then build complexity as you become comfortable.
Step 5: Add Dynamics
Incorporate dynamics to enhance emotional impact. Use softer picking for delicate moments and stronger picking for climactic sections.
Step 6: Refine and Practice
Record yourself playing the arrangement and listen back. Make adjustments as needed. Practice regularly to refine your performance.
Conclusion
Creating your own fingerstyle arrangements is a journey of self-expression. Follow these steps, and you’ll be well on your way to crafting beautiful music that reflects your unique style.
0 Comments