

FINGERPICKING KEY
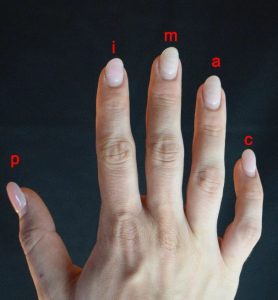
The right hand:
P = Thumb
I = Index
M = Middle
A = Ring
Fingerpicking Pattern No. 1
This is the most essential fingerpicking pattern to start with. It requires no left hand chord or fretted notes. It is used in many popular fingerpicking songs and some songs are slight variations of this same pattern.
We have all open strings being plucked in sequential order. Each note is a quarter note in duration and will last exactly one second each if played at 60bpm.
Lets get to playing!
We will pluck each open string in order starting from the 6th string (Low E) and ending on the 1st (High E).
Step 1. Lets start with thumb (p) and pluck the 6th-4th string
Step 2. Pluck index (i), middle (m) and ring (a) on the 3rd-1st strings.

Here is a video demonstration of the finger picking pattern:
If you were having trouble please contact us and we will help you!
FOLLOW US ON
Get our FREE Fingerstyle Workbook!
RELATED BLOG POSTS

The Ultimate Guide to Fingerstyle Guitar Techniques: From Basics to Advanced
Fingerstyle guitar is a beautiful and expressive way to play, allowing for a rich harmonic texture and intricate melodies. Whether you’re a complete beginner or an experienced player looking to expand your skills, this ultimate guide will take you through essential fingerstyle techniques, from the basics to advanced concepts.
Getting Started: The Basics of Fingerstyle Guitar
1. Finger Positioning
Before diving into techniques, it’s crucial to understand proper finger positioning. Your thumb (P) should be used for the bass notes, while your index (I), middle (M), and ring (A) fingers will handle the melody and harmony.
2. Basic Fingerpicking Patterns
Start with simple patterns. A common one is the “Travis picking” pattern, which alternates between the thumb and fingers.
Exercise: Try playing a C major chord and alternate between the bass note (C) with your thumb and the third (E) and second (G) strings with your index and middle fingers.
Intermediate Techniques: Thumb Independence and Alternating Bass
1. Thumb Independence
Developing thumb independence is crucial for fingerstyle playing. Practice playing a steady bass line with your thumb while your fingers play a melody.
Exercise: Choose a simple melody and play it over a steady bass line. Focus on keeping the thumb consistent while your fingers move independently.
2. Alternating Bass
This technique involves alternating between two or more bass notes, creating a fuller sound.
Exercise: Practice playing an alternating bass line with your thumb, while your fingers play a simple melody.
Advanced Techniques: Harmonics and Complex Patterns
1. Harmonics
Harmonics add a unique sound to fingerstyle arrangements. They are created by lightly touching a string with your finger while plucking it.
Exercise: Find the 5th fret of the high E string and use your ring finger to lightly touch the string while plucking it with your thumb.
2. Complex Patterns
Once you are comfortable with the basics, start experimenting with more complex fingerpicking patterns, incorporating syncopation and varied rhythms.
Exercise: Create your own patterns or learn from advanced pieces, focusing on integrating various techniques you’ve learned.
Conclusion
Fingerstyle guitar is a rewarding journey that combines technical skill with musicality. By practicing these techniques, you’ll build a solid foundation for your playing and open the door to endless creativity.
Developing Independent Fingers for Fingerstyle Guitar
3. Developing Independent Fingers for Fingerstyle Guitar
Introduction
As a beginner, one of the biggest challenges in fingerstyle guitar is developing independence between your fingers. Unlike traditional flatpicking, where you hold a pick in one hand, fingerstyle requires you to use each finger for a different part of the music, all while maintaining a steady rhythm. This can be tricky at first, but with some practice, you can develop smooth finger independence that will make your playing more fluid and expressive.
In this post, we’ll explore how to strengthen and coordinate your fingers for fingerstyle guitar, with exercises that will help you build independence between your thumb, index, middle, and ring fingers.
Why Finger Independence is Crucial for Fingerstyle
In fingerstyle, the thumb is generally responsible for playing the bass notes, while your fingers handle the melody and harmony. To create smooth, flowing fingerstyle arrangements, you need each finger to work independently from the others.
For example, your thumb might be playing a steady bassline while your index and middle fingers are picking a melody. These two tasks require different motions and levels of control. Without good finger independence, it can be difficult to maintain smooth rhythm and melody simultaneously.
Building Finger Independence: Basic Exercises
Let’s break down some simple exercises to build finger independence.
Exercise 1: Basic Thumb-Finger Coordination
Start with a simple C chord and work on coordinating your thumb and fingers.
Play the 5th string with your thumb.
Play the 3rd string with your index finger.
Play the 4th string with your thumb.
Play the 2nd string with your middle finger.
This exercise will help you coordinate between the thumb and fingers, which is essential for fingerstyle playing.
Exercise 2: Introducing the Ring Finger
Now, let’s add in the ring finger for a more complete pattern. Practice this with a C chord:
Play the 5th string with your thumb.
Play the 3rd string with your index finger.
Play the 4th string with your thumb.
Play the 2nd string with your middle
Mastering the Thumb: The Foundation of Fingerstyle
2. Mastering the Thumb: The Foundation of Fingerstyle
Introduction
The thumb is arguably the most important element of fingerstyle guitar. It is the foundation of your rhythm and the backbone of your sound. When played correctly, the thumb can create a rich and full bassline while allowing your fingers to handle the melody and harmonies.
In this post, we’re going to focus on how to develop a strong and controlled thumb technique that will give you a solid base for your fingerstyle playing.
Why the Thumb is So Important
In fingerstyle, the thumb is typically responsible for playing the bass notes. These bass notes not only provide harmonic support but also give the music its drive and rhythm. The thumb helps define the tempo, and when executed well, it can give your playing a solid, “groovy” foundation.
How to Position Your Thumb
To get the best results with your thumb, it’s essential to maintain the correct hand position. Here’s how:
Relaxed Hand Position: Keep your hand relaxed. Tension in the thumb or hand will lead to strain and poor technique. Your thumb should hover above the lower strings, with your palm open and fingers resting lightly on the higher strings.
Curved Thumb: The thumb should be slightly curved as it strikes the string. It should make contact with the string using the pad of the thumb, not the tip.
Muted Strings: The underside of your thumb (the fleshy part) can help mute strings that you’re not playing. This keeps the overall sound clean.
Strengthening the Thumb
Just like any muscle, your thumb will need some conditioning to become strong and efficient for fingerstyle.
Exercise 1: Simple Thumb Alternation
Start with a simple C chord and practice alternating between the 5th and 4th strings with your thumb.
Play the 5th string with your thumb.
Play the 4th string with your thumb.
Alternate between these two strings, keeping your thumb relaxed but controlled.
Repeat this for several minutes, gradually increasing the speed. This will help build up strength in your thumb and create muscle memory for alternating basslines.
Exercise 2: Thumb and Finger Synchronization
Now, let’s add in the fingers. Use a simple alternating bass pattern.
Play the 5th string with your thumb.
Use your index finger to pluck the 3rd string.
Play the 4th string with your thumb.
Use your middle finger to pluck the 2nd string.
This exercise will help you coordinate your thumb and fingers, which is vital for smooth, fluid fingerstyle playing.
Common Thumb Problems (and How to Fix Them)
Tension in the Thumb: If you feel tension in your thumb, it’s probably because you’re gripping the neck too tightly. Relax your hand and focus on using the fleshy part of the thumb to strike the string, not the tip.
Inconsistent Volume: If your thumb is playing unevenly, try focusing on keeping the attack of the thumb consistent. Practice controlling the amount of pressure you apply to the strings for even volume.
Conclusion
Mastering your thumb is one of the most important steps in becoming a fingerstyle guitarist. With time and patience, you’ll develop the strength and coordination needed to create powerful basslines that lay the foundation for the rest of your fingerstyle playing. Keep practicing the exercises, and remember: a relaxed, controlled thumb will help you build a solid base for your entire sound.
Happy playing!
0 Comments