

FINGERPICKING KEY
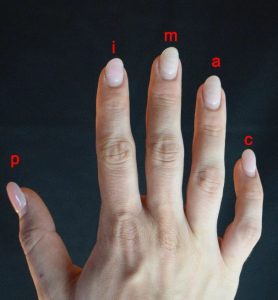
The right hand:
P = Thumb
I = Index
M = Middle
A = Ring
Fingerpicking Pattern No. 1
This is the most essential fingerpicking pattern to start with. It requires no left hand chord or fretted notes. It is used in many popular fingerpicking songs and some songs are slight variations of this same pattern.
We have all open strings being plucked in sequential order. Each note is a quarter note in duration and will last exactly one second each if played at 60bpm.
Lets get to playing!
We will pluck each open string in order starting from the 6th string (Low E) and ending on the 1st (High E).
Step 1. Lets start with thumb (p) and pluck the 6th-4th string
Step 2. Pluck index (i), middle (m) and ring (a) on the 3rd-1st strings.

Here is a video demonstration of the finger picking pattern:
If you were having trouble please contact us and we will help you!
FOLLOW US ON
Get our FREE Fingerstyle Workbook!
RELATED BLOG POSTS

Advanced Fingerstyle Techniques to Enhance Your Playing
Once you’ve mastered the basics of fingerstyle guitar, it’s time to move on to more advanced techniques that will truly elevate your playing. Advanced fingerstyle techniques add complexity, expressiveness, and musicality to your performance. Here are several advanced fingerstyle techniques to incorporate into your practice routine.
1. Thumb Overlap
Thumb overlap is an advanced technique where the thumb plays both bass notes and higher string notes in rapid succession, often within the same measure. This technique allows you to cover multiple strings with your thumb, enabling you to create a fuller, more complex sound. To master thumb overlap, practice alternating between the bass strings (E, A, and D) while the thumb also reaches over to pluck higher notes on the G string or B string.
2. Hammer-Ons and Pull-Offs (Advanced)
While hammer-ons and pull-offs are basic techniques, advanced players incorporate them into more intricate patterns. Try integrating these techniques into your arpeggios or picking patterns to create smoother, more flowing transitions. For instance, you can play a note and then quickly hammer-on to the next note without picking again, which creates a fluid and connected sound.
3. Artificial Harmonics
Artificial harmonics are a technique where you use your fretting hand to lightly touch a string while plucking it with your picking hand. This produces a harmonic note, adding a bell-like tone to your playing. To create artificial harmonics, press lightly on the string above the fret (usually around the 12th, 7th, or 5th fret) while plucking the string with your thumb or pick. This technique is commonly used in advanced fingerstyle to add sparkle and tonal variety.
4. Fingerstyle Slap Bass
Fingerstyle slap bass adds rhythmic punch to your playing, and it’s often used in fingerstyle jazz or contemporary music. The slap is created by striking the strings with your thumb or the side of your fingers. Practice alternating between slap bass notes and plucking regular bass notes to create a unique rhythmical texture. This technique is great for adding groove and depth to your pieces.
5. Travis Picking with Syncopation
Travis picking involves alternating between bass and melody notes. However, adding syncopation creates a more intricate and dynamic rhythm. Syncopation in fingerstyle involves shifting the emphasis of the beats or notes, creating a unique off-beat pattern. Try incorporating syncopation into your Travis picking to add an extra layer of complexity to your sound.
6. Fingerstyle Tapping
Fingerstyle tapping is a technique where you use your fingers to tap the fretboard, producing a percussive and melodic effect. This technique is more commonly seen in electric guitar playing but can be equally effective on acoustic guitar. To tap, use your picking hand’s fingers to tap on the fretboard while simultaneously picking the string. Practice this technique slowly at first to ensure clean, precise tapping.
7. Fretboard Legato
Legato is a technique that allows you to play smooth, connected notes with minimal picking. It’s achieved through a combination of hammer-ons, pull-offs, and slides. For an advanced fingerstyle approach, use legato techniques to create smooth transitions between notes, eliminating the need to pick each note individually. This results in a more fluid and effortless sound.
8. Crosspicking
Crosspicking is a technique where you alternate between upstrokes and downstrokes, often in rapid succession, to create a rolling, “harp-like” sound. It’s commonly used in bluegrass and country music, but it can be applied to fingerstyle playing to create a dynamic, flowing texture. To practice crosspicking, start slowly with simple patterns and increase speed as you become more comfortable.
9. Percussive Fingerstyle
Percussive fingerstyle incorporates tapping or slapping the body of the guitar to add rhythm to the music. You can combine percussive hits with fingerpicking patterns to create a groove. This technique adds a rhythmic layer to the melody and bass, making your playing more dynamic and interactive. Focus on achieving clean taps on the body of the guitar without interfering with your picking or fretting.
10. Alternate Tunings
Advanced fingerstyle guitarists often experiment with alternate tunings, which change the way the strings are tuned to produce unique harmonic possibilities. Common tunings like Drop D, DADGAD, and open tunings open up new ways to play chords and melodies. Experimenting with these tunings can provide new inspiration and challenges for your fingerstyle playing.
Conclusion
Advanced fingerstyle techniques add richness, complexity, and flair to your playing. By mastering thumb overlap, artificial harmonics, fingerstyle slap bass, and other advanced techniques, you’ll enhance both the technical and emotional depth of your guitar playing. Consistent practice, experimentation, and patience will help you integrate these advanced techniques into your repertoire, allowing you to create truly unique and captivating performances. Keep challenging yourself, and the possibilities with fingerstyle guitar are endless!
How to Improve Your Fingerpicking Speed
Speed is an important aspect of fingerstyle guitar, allowing you to play more intricate pieces and express your musicality with greater fluidity. However, improving fingerpicking speed is not about rushing through songs; it’s about building control, muscle memory, and consistency. In this post, we’ll discuss proven techniques to help you increase your fingerpicking speed without sacrificing accuracy or tone.
1. Start Slow and Focus on Accuracy
It’s essential to start slowly when working on fingerpicking speed. Rushing through exercises can lead to sloppy playing and bad habits. Begin with a comfortable tempo and focus on playing each note cleanly. Pay attention to the clarity of your bass notes and melody notes. As you improve your accuracy, you’ll naturally be able to increase your speed without losing control of your technique.
2. Use a Metronome
A metronome is an essential tool for improving your fingerpicking speed. It helps you develop a steady rhythm and ensures that you’re maintaining consistent timing. Start by setting your metronome to a slow tempo and practice the fingerpicking pattern. Once you’re comfortable, gradually increase the tempo in small increments. The goal is to gradually build speed while maintaining precision and timing.
3. Break Down Complex Patterns
If you’re working on a complex fingerpicking pattern, break it down into smaller, manageable sections. Focus on one part of the pattern at a time until you’ve mastered it, then slowly put the sections together. This approach helps avoid overwhelm and lets you build up speed more effectively. Repeating sections will also help embed them into your muscle memory.
4. Focus on Finger Independence
Finger independence is crucial for developing speed. Start with exercises that isolate your thumb and fingers, ensuring each part of your hand is working independently. For example, practice playing a bass note with your thumb while the index, middle, and ring fingers play melody notes. Working on finger independence exercises will improve coordination, making it easier to achieve faster, more fluid playing.
5. Relax Your Hand and Fingers
Tension is the enemy of speed. The more relaxed your hand and fingers are, the faster and more accurately you’ll be able to pick the strings. If you notice tension building up in your hand or wrist, take a break and shake it out. Stay mindful of maintaining a relaxed, controlled posture during your practice. Over time, this will help you play faster with more fluidity.
6. Practice with Simple Exercises
To build speed, begin by practicing basic fingerpicking exercises. For instance, work on alternating thumb and finger patterns (e.g., thumb on bass notes, index and middle fingers on melody strings) at a slow tempo. Once you’re comfortable, increase the tempo incrementally. Simple exercises like these build the foundation for more complex fingerpicking patterns while helping you develop muscle memory and accuracy.
7. Build Finger Strength and Dexterity
Finger strength and dexterity are vital for improving speed. Incorporate exercises that strengthen your fingers, such as practicing scales or simple chords with fingerpicking. You can also work on exercises that involve playing single notes and intervals on each string, slowly building up to faster tempos. Finger push-ups or using a stress ball can also help increase finger strength for faster, more efficient playing.
8. Use Economy of Motion
As you work on increasing speed, try to minimize unnecessary hand movement. The less you move your fingers, the faster you’ll be able to play. Focus on keeping your movements small, controlled, and precise. This will allow you to develop more speed without over-exerting yourself.
9. Stay Consistent and Patient
Improving speed takes time and consistency. Set aside time each day to practice fingerpicking techniques, even if it’s just for 10–15 minutes. Consistent practice will yield gradual improvements, and with time, you’ll be able to play faster without sacrificing accuracy. Be patient and celebrate your progress, no matter how small.
Conclusion
Increasing your fingerpicking speed requires dedication, patience, and practice. By focusing on accuracy, finger independence, and relaxation, you’ll be able to develop faster playing over time. Use a metronome, break down patterns, and focus on building muscle memory. As your speed increases, you’ll notice a greater level of control and expressiveness in your fingerstyle guitar playing. Stick with it, and soon you’ll be playing your favorite pieces at lightning speed!
Fingerstyle Guitar Basics: Understanding Finger Placement
Fingerstyle guitar is a versatile and expressive technique that requires proper finger placement for clean, accurate playing. Whether you’re just starting out or want to improve your existing technique, understanding finger placement is key to mastering fingerstyle guitar. In this post, we’ll break down the fundamentals of finger placement and how to apply them to your playing.
1. The Basic Fingerstyle Hand Position
A relaxed and ergonomic hand position is essential for proper fingerstyle technique. Start by ensuring that your hand is relaxed and hovering slightly above the strings. Your wrist should be straight, and your fingers should be naturally curled, with your fingertips touching the strings. Avoid any unnecessary tension in your hand or wrist, as this can impede your playing and lead to discomfort or injury.
2. The Thumb – Your Bass Player
In fingerstyle, the thumb is responsible for plucking the bass strings (typically the E, A, and D strings). The thumb should be positioned in a way that allows it to strike the strings cleanly and with precision. Keep your thumb curved slightly, and aim to strike the strings with the pad of your thumb, not the side. A relaxed but controlled thumb motion is important for even, consistent bass notes.
3. The Index, Middle, and Ring Fingers – Melody and Harmony
The index, middle, and ring fingers are used to pluck the higher strings (G, B, and high E). Each finger should be used to pluck a specific string to maintain clarity and control. For most players, the index finger handles the G string, the middle finger handles the B string, and the ring finger handles the high E string. Practice using each finger independently to build strength and control.
4. Finger Curvature and Positioning
When playing fingerstyle, it’s important to maintain proper finger curvature to ensure that your fingertips strike the strings cleanly. Your fingers should remain curved, with the pads of your fingers making contact with the strings. Avoid flattening your fingers, as this will produce muted or unclear notes. The curvature of your fingers should feel natural, with a slight bend at the knuckles.
5. Keeping Your Fingers Relaxed
Tension is the enemy of good fingerstyle playing. It’s essential to keep your fingers relaxed while playing, as this will allow for greater precision and fluidity. Tension in your hand or fingers can result in unnecessary movement, which will interfere with your accuracy and timing. Always check for relaxation in your fingers and wrist when playing.
6. Using the Right Amount of Pressure
While playing fingerstyle guitar, you’ll need to apply just the right amount of pressure to each string. Pressing too hard can make the note sound sharp or muted, while not pressing hard enough can lead to buzzing. Focus on applying enough pressure to get a clear, crisp tone, but not so much that you create unwanted distortion.
7. Developing Finger Independence
Finger independence is a key skill for any fingerstyle guitarist. You’ll need to develop the ability to use each finger independently, allowing the thumb to play the bass notes while the other fingers handle the melody and harmony. To improve finger independence, practice simple exercises where the thumb plays the bass notes, and the other fingers pick notes on the higher strings.
8. Practice with a Purpose
Now that you understand finger placement, it’s time to put it into practice. Start with simple fingerpicking patterns and chord progressions, focusing on maintaining proper finger placement throughout. Gradually increase the complexity of the pieces you practice while paying attention to your finger positioning. Consistent practice is key to developing muscle memory and improving your fingerstyle technique.
Conclusion
Finger placement is a critical aspect of fingerstyle guitar that will significantly impact your overall sound and technique. By focusing on hand position, finger curvature, and independence, you’ll be able to play more cleanly, accurately, and expressively. Keep practicing, and with time, proper finger placement will become second nature, allowing you to tackle more complex fingerstyle pieces with ease.
0 Comments