

FINGERPICKING KEY
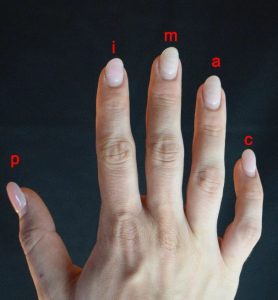
The right hand:
P = Thumb
I = Index
M = Middle
A = Ring
Fingerpicking Pattern No. 1
This is the most essential fingerpicking pattern to start with. It requires no left hand chord or fretted notes. It is used in many popular fingerpicking songs and some songs are slight variations of this same pattern.
We have all open strings being plucked in sequential order. Each note is a quarter note in duration and will last exactly one second each if played at 60bpm.
Lets get to playing!
We will pluck each open string in order starting from the 6th string (Low E) and ending on the 1st (High E).
Step 1. Lets start with thumb (p) and pluck the 6th-4th string
Step 2. Pluck index (i), middle (m) and ring (a) on the 3rd-1st strings.

Here is a video demonstration of the finger picking pattern:
If you were having trouble please contact us and we will help you!
FOLLOW US ON
Get our FREE Fingerstyle Workbook!
RELATED BLOG POSTS

How to Build Finger Strength and Dexterity
Building finger strength and dexterity is essential for any guitarist, especially those focusing on fingerstyle techniques. Here are some effective exercises to enhance your finger agility and power.
Start with simple finger exercises such as scales and arpeggios. Practicing these regularly not only strengthens your fingers but also improves your overall technique. Focus on playing each note cleanly and evenly, gradually increasing your speed.
Another effective exercise involves finger independence drills. Place your fingers on the fretboard, and lift them one at a time while keeping the others pressed down. This helps develop control and coordination, crucial for intricate fingerstyle patterns.
Incorporate the use of a hand grip or rubber band to strengthen your fingers. Squeeze the grip or stretch the band with your fingers to build muscle. Regular practice will lead to noticeable improvements in finger strength.
Lastly, don’t overlook the importance of proper warm-up routines. Before diving into practice, spend a few minutes warming up your fingers with simple exercises. This prepares your muscles and prevents injuries.
Building finger strength and dexterity takes time, so be patient and consistent. With dedication, you’ll notice significant improvements in your fingerstyle playing, allowing you to tackle more complex pieces with ease.
Advanced Fingerstyle Techniques: Harmonics and Tapping
Once you’ve mastered basic fingerpicking, it’s time to explore advanced techniques like harmonics and tapping. These methods can significantly enhance your fingerstyle guitar playing, adding depth and complexity to your sound.
Harmonics are produced by lightly touching the string at certain points, creating a bell-like tone. To achieve this, place your finger directly above the fret wire (not in between) and pluck the string with your other hand. Start with natural harmonics on the 5th, 7th, and 12th frets, as these are the most accessible.
Incorporating tapping into your fingerstyle repertoire can create an exciting and dynamic sound. This technique involves using your fingers to tap notes on the fretboard, allowing for rapid note sequences and melodic lines. Begin by practicing a simple tapping exercise: tap the 12th fret with your right-hand fingers while maintaining a consistent rhythm with your left-hand notes.
Combining these techniques can produce intricate melodies and rhythms. Try integrating harmonics into your tapping sequences for a unique sound that captivates your audience. Practice slowly and gradually increase your speed, ensuring clarity in each note.
Remember to be patient with yourself as you learn these advanced techniques. With practice, harmonics and tapping can become signature elements in your fingerstyle playing, setting you apart as a guitarist.
Basic Fingerpicking Patterns for Beginners
Fingerpicking is a fundamental skill for guitarists that opens up a world of musical expression. If you’re a beginner eager to enhance your playing, mastering basic fingerpicking patterns is an excellent first step. These patterns provide the foundation for more complex techniques and allow you to play a variety of songs across different genres.
Start with the classic PIMA technique, which stands for Thumb (P), Index (I), Middle (M), and Ring (A). A simple yet effective pattern is the alternating bass pattern, where you pluck the bass note with your thumb and the higher strings with your fingers. For example, on a C chord, pluck the 5th string (C) with your thumb, then the 3rd (G) with your index finger, 2nd (E) with your middle finger, and finally the 1st (C) with your ring finger. Repeat this cycle to create a soothing rhythm.
Another essential pattern is the Travis picking technique, where the thumb plays a steady bass line while the fingers pluck the melody. This creates a rich, layered sound. Start slow and focus on accuracy before increasing your speed.
Practicing these patterns not only builds muscle memory but also helps you develop a sense of timing and rhythm. As you progress, try combining different patterns and experimenting with dynamics to make your playing more expressive. Remember, consistency is key, so dedicate time each day to practice these fundamental fingerpicking patterns.
0 Comments