

FINGERPICKING KEY
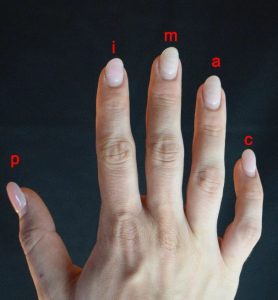
The right hand:
P = Thumb
I = Index
M = Middle
A = Ring
Fingerpicking Pattern No. 1
This is the most essential fingerpicking pattern to start with. It requires no left hand chord or fretted notes. It is used in many popular fingerpicking songs and some songs are slight variations of this same pattern.
We have all open strings being plucked in sequential order. Each note is a quarter note in duration and will last exactly one second each if played at 60bpm.
Lets get to playing!
We will pluck each open string in order starting from the 6th string (Low E) and ending on the 1st (High E).
Step 1. Lets start with thumb (p) and pluck the 6th-4th string
Step 2. Pluck index (i), middle (m) and ring (a) on the 3rd-1st strings.

Here is a video demonstration of the finger picking pattern:
If you were having trouble please contact us and we will help you!
FOLLOW US ON
Get our FREE Fingerstyle Workbook!
RELATED BLOG POSTS

Introduction to Fingerstyle Guitar: Beginner-Friendly Lessons
Learning fingerstyle guitar is a rewarding journey, and it all starts with the basics. If you’re just starting, understanding fingerstyle techniques will set the foundation for your musical growth. This post will guide you through the core elements of fingerstyle guitar, including hand positioning and beginner-friendly patterns.
What is Fingerstyle Guitar? Fingerstyle guitar involves plucking the strings with your fingers, rather than using a pick. This allows for more nuanced control over the melody and rhythm, creating intricate, beautiful sounds. A typical fingerstyle player uses their thumb for bass notes (the lower strings) and their fingers (index, middle, and sometimes ring) for melody and harmony (higher strings).
Proper Hand Positioning To get started, ensure your hand is relaxed, with your thumb hovering near the lower strings (E, A, D) and your fingers over the higher strings (G, B, E). Your thumb should alternate between bass notes, while your fingers pick out the melody and harmony.
Basic Fingerpicking Patterns The simplest pattern to start with is the Travis picking pattern, where your thumb alternates between bass strings (E, A, D), and your fingers pick out the higher strings. Start with this pattern and gradually build up to more complex variations.
The Evolution of Fingerstyle Guitar: From Classic to Contemporary
Fingerstyle guitar has evolved through the years. Here’s how it developed:
1. Classical Fingerstyle
Pioneered by Andrés Segovia, classical fingerstyle involved intricate melodies and complex finger movements.
2. Blues Fingerstyle
Blues artists like Robert Johnson and Mississippi John Hurt brought fingerstyle to the forefront with iconic sounds.
3. Modern Fingerstyle
Artists like Tommy Emmanuel and Andy McKee have popularized modern fingerstyle with fast, percussive techniques.
Fingerstyle continues to evolve, blending tradition with innovation to create exciting new sounds.
How to Use Fingerstyle Guitar to Accompany Your Voice
Fingerstyle guitar can enhance your vocal performance. Here’s how to combine both effectively:
1. Keep the Rhythm Steady
Use your thumb to maintain a strong bass while your fingers pick the melody, allowing you to focus on singing.
2. Focus on Simple Patterns
Start with basic patterns like Travis picking, and add complexity once you’re comfortable.
3. Add Harmonies
Once you’ve mastered the basics, complement your voice with harmonies and chord embellishments.
4. Play with Dynamics
Use dynamics to mirror the song’s emotional flow—soft for verses, louder for choruses.
0 Comments