
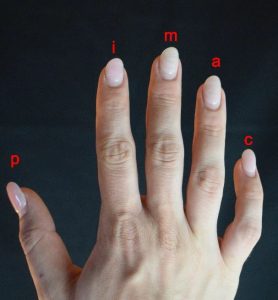
One of the most common questions that arise when discussing fingerstyle is if you should use nails or flesh when playing.
Nails require you to either grow out your fingernail or apply acrylics whereas flesh doesn’t require any additional maintenance except for cutting the nails.
You may be asking, what are the main differences and advantages/disadvantages between the two?
Nails
Right off the bat, nails are going to provide a brighter tone due to the material that is striking through the string. With proper shaping and filing technique the nails could provide a warmer tone. This requires several adjustments with the filing of the nail in order for the nail to come out just right for your specific right hand technique. There are many different angles & approaches but all have the same principle.
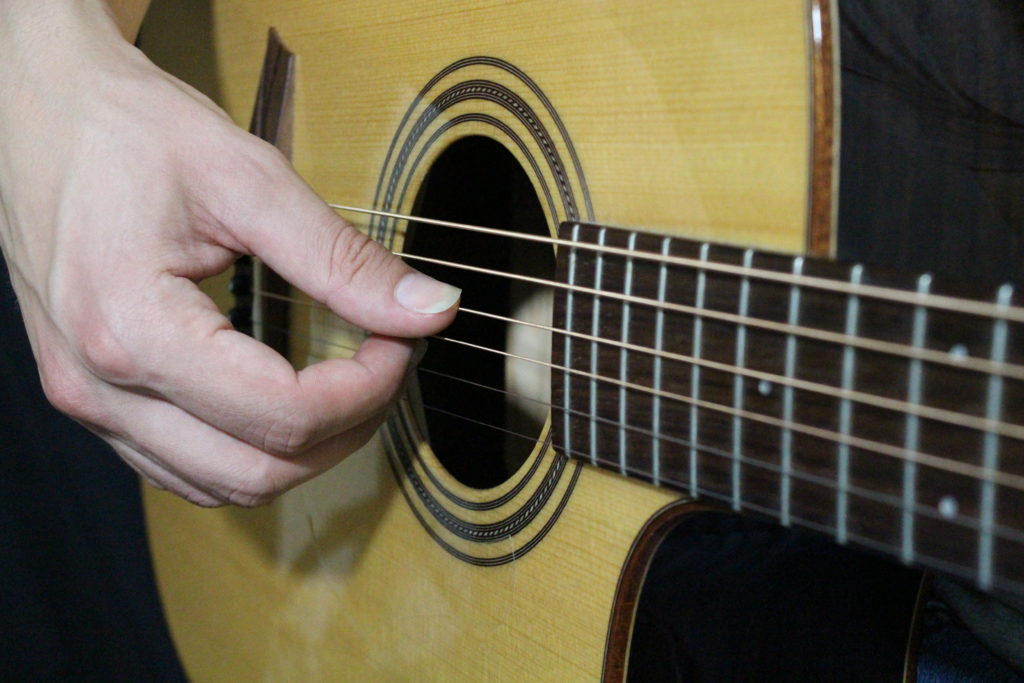
This picture demonstrates a good nail length and shaping to start with:
Flesh
This route is the most common to start with, as it doesn’t require any additional work in order to play fingerpicking guitar. If we forget the nails and disregard any artificial product we use our flesh to fingerpick. The flesh provides a much warmer tone and less volume as well as dynamic range since it’s not likely to project as well as nails.
Here is a video on nail shaping I recommend:
Deciding on your nails or flesh is based on your personal taste and the sound that you’re trying to achieve. If you were a fingerstyle player or classical guitar player it is recommended that you at least try the nails and see if they’re a good fit for you. If you have brittle nails, there are hardening products and vitamins that can help to be able to strengthen them.
Learn more about technique through our FREE Fingerstyle Workbook!
FOLLOW US ON
Get our FREE Fingerstyle Workbook!

RELATED BLOG POSTS

Guitar Setup Guide
A proper guitar setup is essential for achieving the best possible playing experience. By adjusting the various components of your guitar, such as the neck, bridge, and nut, you can ensure that your instrument plays and sounds its best.
When setting up your guitar, it is important to start with the neck adjustment. The neck should be straight and free of any bowing or twisting. A truss rod adjustment may be necessary to correct any issues with the neck.
Next, you should adjust the bridge setup to ensure proper string height and intonation. Make sure that the strings are sitting at the correct height above the fretboard and that they are properly intonated for accurate tuning.
If your guitar nut is worn or damaged, it may need to be replaced. A new nut can improve the tone and playability of your instrument.
Finally, adjusting the guitar action can help improve the overall playability of your instrument. The action refers to the height of the strings above the fretboard and can be adjusted to suit your playing style and preferences.
By following these tips for a proper guitar setup, you can ensure that your instrument plays and sounds its best every time you pick it up to play.
Guitar Repair Basics
As a guitar player, it is important to understand the basics of guitar repair in order to keep your instrument in top condition. Whether you are a beginner or a seasoned player, knowing how to properly care for and repair your guitar can save you time and money in the long run.
Some common guitar repairs that you may encounter include adjusting the guitar neck, setting up the guitar bridge, replacing the guitar nut, and changing the guitar strings. These repairs can be done at home with the right tools and a little bit of know-how.
Before attempting any repairs, it is important to assess the condition of your guitar and determine what needs to be fixed. If you are unsure of what repairs need to be made, it may be best to take your guitar to a professional luthier for a consultation.
By learning the basics of guitar repair and maintenance, you can keep your instrument in top condition and ensure that it continues to produce beautiful music for years to come.
Guitar Intonation Adjustment
Guitar Intonation:
Guitar intonation refers to the accuracy of the notes played on the fretboard. Proper intonation is essential for ensuring that your guitar plays in tune across all frets. Here are some tips for achieving optimal guitar intonation:
Check for proper string height: The action of your guitar (string height) can affect intonation. Make sure the strings are at the correct height to prevent buzzing and ensure accurate intonation.
Use a good tuner: Tuning your guitar accurately is crucial for achieving proper intonation. Invest in a quality tuner and tune your guitar regularly to maintain accurate intonation.
Adjust the saddle position: The saddle on your guitar’s bridge can be adjusted to fine-tune intonation. Use a screwdriver to move the saddle forwards or backward until the intonation is correct on each string.
Check the nut height: The height of the nut can also affect intonation. Make sure the nut is at the correct height to prevent fretting out and ensure accurate intonation.
Listen for consistency: Play notes across the fretboard and listen for any discrepancies in pitch. Adjust the saddle position as needed to achieve consistent intonation across all frets.
By following these tips and regularly maintaining your guitar’s intonation, you can ensure that your instrument plays in tune and sounds its best.
0 Comments