Select Page

Nails vs. Flesh for playing Fingerstyle Guitar

Nails vs. Flesh for playing Fingerstyle Guitar

by | Mar 24, 2023 | Fingerstyle | 0 comments

One of the most common questions that arise when discussing fingerstyle is if you should use nails or flesh when playing. 

Nails require you to either grow out your fingernail or apply acrylics whereas flesh doesn’t require any additional maintenance except for cutting the nails.

You may be asking, what are the main differences and advantages/disadvantages between the two?

Nails

Right off the bat, nails are going to provide a brighter tone due to the material that is striking through the string. With proper shaping and filing technique the nails could provide a warmer tone. This requires several adjustments with the filing of the nail in order for the nail to come out just right for your specific right hand technique. There are many different angles & approaches but all have the same principle.

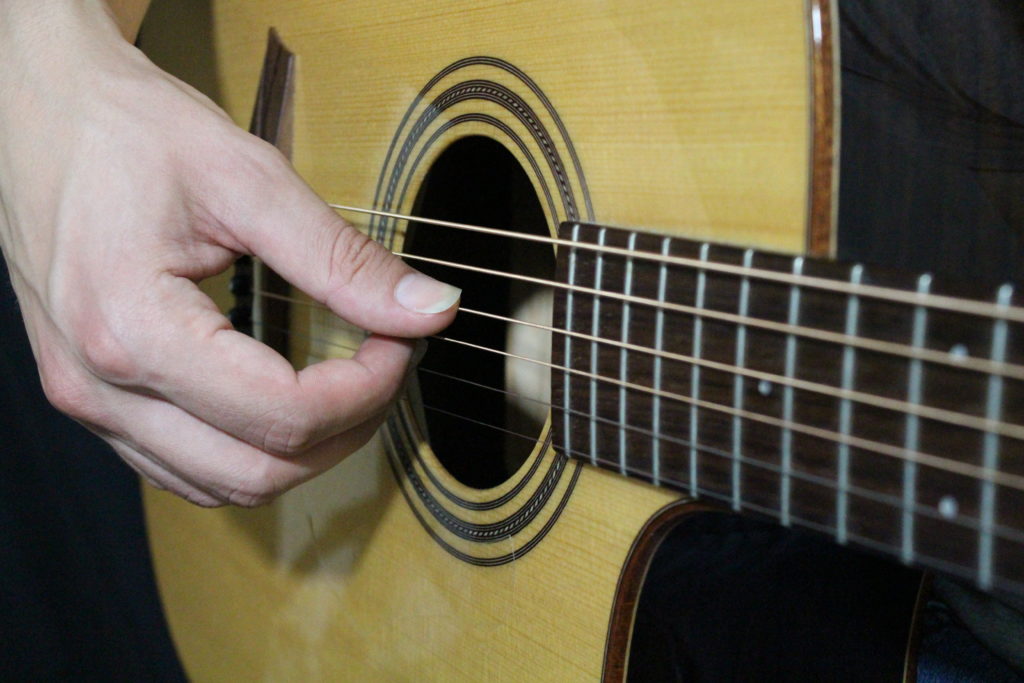
This picture demonstrates a good nail length and shaping to start with:

Flesh

This route is the most common to start with, as it doesn’t require any additional work in order to play fingerpicking guitar. If we forget the nails and disregard any artificial product we use our flesh to fingerpick. The flesh provides a much warmer tone and less volume as well as dynamic range since it’s not likely to project as well as nails. 


Here is a video on nail shaping I recommend:

Deciding on your nails or flesh is based on your personal taste and the sound that you’re trying to achieve. If you were a fingerstyle player or classical guitar player it is recommended that you at least try the nails and see if they’re a good fit for you. If you have brittle nails, there are hardening products and vitamins that can help to be able to strengthen them.


Learn more about technique through our FREE Fingerstyle Workbook!

FOLLOW US ON

Get our FREE Fingerstyle Workbook!

RELATED BLOG POSTS

Developing Independent Fingers for Fingerstyle Guitar

Developing Independent Fingers for Fingerstyle Guitar

3. Developing Independent Fingers for Fingerstyle Guitar
Introduction

As a beginner, one of the biggest challenges in fingerstyle guitar is developing independence between your fingers. Unlike traditional flatpicking, where you hold a pick in one hand, fingerstyle requires you to use each finger for a different part of the music, all while maintaining a steady rhythm. This can be tricky at first, but with some practice, you can develop smooth finger independence that will make your playing more fluid and expressive.

In this post, we’ll explore how to strengthen and coordinate your fingers for fingerstyle guitar, with exercises that will help you build independence between your thumb, index, middle, and ring fingers.

Why Finger Independence is Crucial for Fingerstyle
In fingerstyle, the thumb is generally responsible for playing the bass notes, while your fingers handle the melody and harmony. To create smooth, flowing fingerstyle arrangements, you need each finger to work independently from the others.

For example, your thumb might be playing a steady bassline while your index and middle fingers are picking a melody. These two tasks require different motions and levels of control. Without good finger independence, it can be difficult to maintain smooth rhythm and melody simultaneously.

Building Finger Independence: Basic Exercises
Let’s break down some simple exercises to build finger independence.

Exercise 1: Basic Thumb-Finger Coordination

Start with a simple C chord and work on coordinating your thumb and fingers.

Play the 5th string with your thumb.
Play the 3rd string with your index finger.
Play the 4th string with your thumb.
Play the 2nd string with your middle finger.
This exercise will help you coordinate between the thumb and fingers, which is essential for fingerstyle playing.

Exercise 2: Introducing the Ring Finger

Now, let’s add in the ring finger for a more complete pattern. Practice this with a C chord:

Play the 5th string with your thumb.
Play the 3rd string with your index finger.
Play the 4th string with your thumb.
Play the 2nd string with your middle

Mastering the Thumb: The Foundation of Fingerstyle

Mastering the Thumb: The Foundation of Fingerstyle

2. Mastering the Thumb: The Foundation of Fingerstyle
Introduction

The thumb is arguably the most important element of fingerstyle guitar. It is the foundation of your rhythm and the backbone of your sound. When played correctly, the thumb can create a rich and full bassline while allowing your fingers to handle the melody and harmonies.

In this post, we’re going to focus on how to develop a strong and controlled thumb technique that will give you a solid base for your fingerstyle playing.

Why the Thumb is So Important
In fingerstyle, the thumb is typically responsible for playing the bass notes. These bass notes not only provide harmonic support but also give the music its drive and rhythm. The thumb helps define the tempo, and when executed well, it can give your playing a solid, “groovy” foundation.

How to Position Your Thumb
To get the best results with your thumb, it’s essential to maintain the correct hand position. Here’s how:

Relaxed Hand Position: Keep your hand relaxed. Tension in the thumb or hand will lead to strain and poor technique. Your thumb should hover above the lower strings, with your palm open and fingers resting lightly on the higher strings.
Curved Thumb: The thumb should be slightly curved as it strikes the string. It should make contact with the string using the pad of the thumb, not the tip.
Muted Strings: The underside of your thumb (the fleshy part) can help mute strings that you’re not playing. This keeps the overall sound clean.
Strengthening the Thumb
Just like any muscle, your thumb will need some conditioning to become strong and efficient for fingerstyle.

Exercise 1: Simple Thumb Alternation

Start with a simple C chord and practice alternating between the 5th and 4th strings with your thumb.

Play the 5th string with your thumb.
Play the 4th string with your thumb.
Alternate between these two strings, keeping your thumb relaxed but controlled.
Repeat this for several minutes, gradually increasing the speed. This will help build up strength in your thumb and create muscle memory for alternating basslines.

Exercise 2: Thumb and Finger Synchronization

Now, let’s add in the fingers. Use a simple alternating bass pattern.

Play the 5th string with your thumb.
Use your index finger to pluck the 3rd string.
Play the 4th string with your thumb.
Use your middle finger to pluck the 2nd string.
This exercise will help you coordinate your thumb and fingers, which is vital for smooth, fluid fingerstyle playing.

Common Thumb Problems (and How to Fix Them)
Tension in the Thumb: If you feel tension in your thumb, it’s probably because you’re gripping the neck too tightly. Relax your hand and focus on using the fleshy part of the thumb to strike the string, not the tip.
Inconsistent Volume: If your thumb is playing unevenly, try focusing on keeping the attack of the thumb consistent. Practice controlling the amount of pressure you apply to the strings for even volume.
Conclusion
Mastering your thumb is one of the most important steps in becoming a fingerstyle guitarist. With time and patience, you’ll develop the strength and coordination needed to create powerful basslines that lay the foundation for the rest of your fingerstyle playing. Keep practicing the exercises, and remember: a relaxed, controlled thumb will help you build a solid base for your entire sound.

Happy playing!

The Basics of Fingerstyle Guitar: An Introduction

The Basics of Fingerstyle Guitar: An Introduction

If you’re new to guitar, you’ve probably come across the term “fingerstyle” and wondered what makes it different from regular flatpicking. Fingerstyle guitar is a beautiful, versatile technique that allows you to create intricate melodies, harmonies, and rhythms all at once using just your fingers. Whether you’re drawn to acoustic or classical guitar, fingerstyle can add a whole new level of depth to your playing.

In this post, we’ll dive into the basics of fingerstyle guitar, break down the technique, and give you a solid foundation to start your fingerpicking journey. What is Fingerstyle Guitar?
Fingerstyle guitar is a technique where the player uses their fingers (instead of a pick) to pluck the strings. The thumb typically handles the bass notes (usually on the lower strings), while the fingers (index, middle, and sometimes ring) handle the melody and harmony on the higher strings.

Fingerstyle differs from flatpicking, where a pick is used to strike the strings, allowing more nuanced control over dynamics and tone. It also enables you to play multiple voices at once, combining basslines, chord progressions, and melodies in a single performance.

Key Concepts to Understand Fingerstyle
Before you start playing, let’s break down some essential concepts.

1. Hand Positioning

Proper hand positioning is crucial for comfortable and efficient fingerstyle playing.

Thumb: The thumb controls the bass notes and is responsible for playing the lower strings (usually the 6th, 5th, and 4th). It should move independently of the fingers, but all the movements should feel natural.
Fingers: Your index, middle, and ring fingers (sometimes the pinky too) are responsible for plucking the higher strings. These fingers should remain relaxed and curved, using the pads of the fingers to strike the strings.
2. Common Fingerstyle Patterns

At the heart of fingerstyle guitar are picking patterns that alternate between the thumb and fingers. One of the most common patterns is:

P (Thumb): Plays the bass note (6th, 5th, or 4th string).
I (Index): Plays the 3rd string.
M (Middle): Plays the 2nd string.
A (Ring): Plays the 1st string.
This pattern can be varied by adding syncopation, skipping strings, or using finger substitutions. But starting with this basic pattern will give you a solid foundation.

Getting Started: Basic Exercises
Exercise 1: Thumb and Finger Coordination

Start with a simple exercise to practice using your thumb and fingers independently.

Play a C major chord.
Use your thumb to pluck the 5th string (the root note).
Use your index finger to pluck the 3rd string.
Use your middle finger to pluck the 2nd string.
Keep the fingers relaxed and try to maintain a steady rhythm.
Repeat this exercise for several minutes to build muscle memory.

Exercise 2: Alternating Bass

Next, practice alternating between the thumb and fingers. Start with a simple C chord:

Thumb (P) plays the 5th string.
Index (I) plays the 3rd string.
Thumb (P) plays the 4th string.
Middle (M) plays the 2nd string.
This will help you develop coordination between the thumb and the fingers, which is essential in most fingerstyle patterns.

Conclusion
Fingerstyle guitar is a rewarding and expressive technique that opens up new possibilities for your playing. By starting with proper hand positioning and focusing on basic exercises, you’ll be on your way to mastering the technique. As you progress, you can experiment with more complex patterns, incorporate melody, and even explore various genres like folk, classical, and blues.

Stay patient, practice regularly, and you’ll see improvements before you know it. Happy playing!

Related Posts

Comments

0 Comments

Submit a Comment

Your email address will not be published. Required fields are marked *

Get ART Guitar School’s lesson tips

straight to your inbox

Sign up today to get notified whenever we post new blog content.